
- 3/5 Hashifinity Stones
- What are we building
- Implementation
- Add lifecycle to server droplet resources too
- cloud-config
- Remove existing entries that point to localhost
- Get Consul
- Enable the consul service

How far is a production-ready Terraform module from the tutorial?
In my estimation, and calibrated to my skill level, it’s about 3-5 days of work.
Read further for how I came to this estimation, and what it means.
3/5 Hashifinity Stones
Over the course of about 3 days of work, I developed a few Terraform modules for Digital Ocean with the goal of deploying a full Hashi environment – Consul, Vault and Nomad. Only Boundary and Waypoint would be needed to complete the full collection of Hashicorp “infinity stones”!
More to the point, these are products which I use personally and professionally, and which I often propose as technical solutions to customers where I work, so I really need to know how practical and effective my knowledge of them is1.
My goal with this post is to talk seriously and objectively about how much work is involved in making a production-ready Terraform module, and what I’ve learned so far making one for Consul on Digital Ocean. Now, I’m not a newbie to Terraform or Consul, and Digital Ocean is probably the world’s simplest well-known cloud, so the threshold to getting something serious done is pretty low.
That being said though, there are a few things which tripped me up on the way, which the cool kids are calling “learnings” these days (ugh, gross).
What are we building
The first lesson is one in design. It’s rare that I get the chance to build something from scratch, so I don’t have much experience when it comes to designing the architecture of something, even something as simple as this. That is not to say that it is particularly difficult, just that it’s an unexercised muscle.
Axes of competence
Before starting out, I wanted to have an honest self-assessment of how hard this should be, according to my competence.
Although I feel very confident in the tooling, and the cloud provider is simple enough to easily know it well, I do not yet feel confident in my skills as an architect. In this case, the architecture is provided by the Consul reference architecture, so I really just need to design the implementation, which I feel a bit more comfortable in.
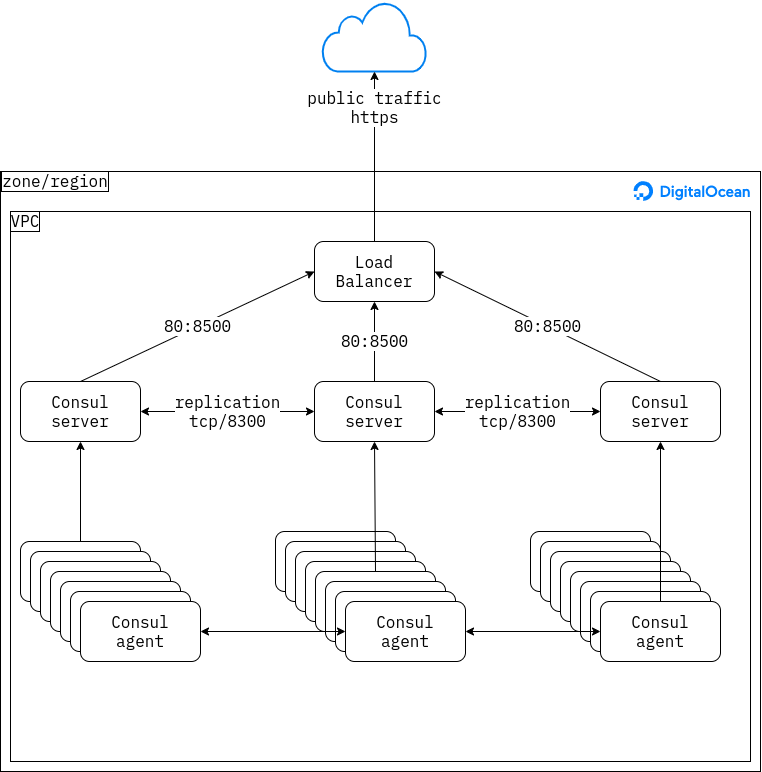
Architecture
I took the Consul Reference Architecture as the starting point for creating a module which would deploy something similar to it in Digital Ocean. Similar to the datacenter deployment guide I started with a single availability zone AMS3.
Following the tutorial, the idea would be to create a set of droplets for the servers, a set of droplets for the agents, and a load balancer to front the servers2. These would all be included in a VPC to allow the agents and servers to communicate with each other over a local network. Cloud firewalls would then protect the instances by allowing only traffic on the Consul ports
Design goals
The goals for this architecture are, in no particular order:
- Concise: As little code should be written and as few tools invoked as necessary, no more.
- Complete: The architecture should be fully described by the modules
- Zero-touch deploy: This should not require human intervention. This goal is similar to the concise goal, but emphasises automation.
- Zero-trust: Sensitive data should be retrieved by authorized actors, rather than allowing access to it implicitly.
- Minimal knowledge: No knowledge about the deploy environment should be assumed, in order to make it re-usable in different situations.
- Immutable and idempotent: The state should be declared as code, and only change when changes to the code are made.
From an operator’s point of view, we should have the experience of setting a few variables, and running terraform deploy.
In the perfect world, no other tasks would be necessary to have a full Consul cluster deployed, agents, servers and all, all fully joined.
Implementation
A common approach here follows the 12-factor approach. Start with a base image, add the base layer of the application that we are deploying (Consul in this case) and then inject configuration via environment variables into that derived image at runtime. That derived image should contain no specific configuration for the application until it is instantiated in a deployed environment. This can include the service advertise address, as well as sensitive data such as TLS certificates and the gossip encryption key.
In this case, we will forgo that step and use only basic OS distribution images, using Cloud Init. This removes a large amount of tooling (Packer and Ansible), at the expense of writing a single fairly large YAML template, with all of the limitations of cloud init (more on this later).
The implementation consists of two Terraform modules:
- Digital Ocean VPC
- Digital Ocean Consul cluster
Thus it could be created as follows:
module "vpc" {
source = "https://github.com/brucellino/terraform-module-digitalocean-vpc/"
vpc_name = var.vpc
project = var.project
}
module "consul" {
source = "https://github.com/brucellino/terraform-digitalocean-consul"
vpc = var.vpc
depends_on = [module.vpc]
project_name = var.project.name
servers = var.servers
ssh_inbound_source_cidrs = var.inbound_ssh_cidrs
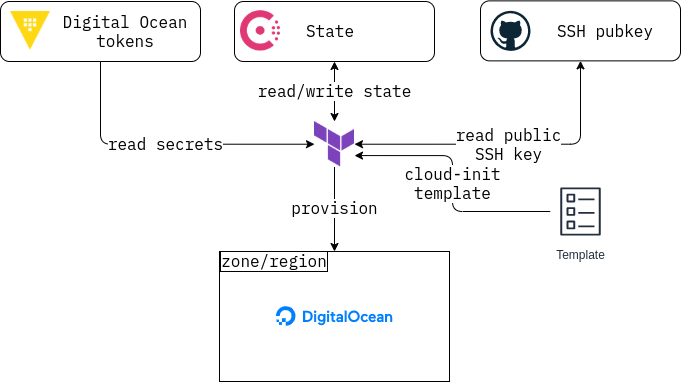
}Here of course, we have declared a few variables in the definition to allow us to create a firewall rules for access from specific locations (typically a Tailscale network), number of servers, etc. Note that there is a dependency on the VPC by the Consul module – as we describe below, the Consul module looks up existing VPC resources to deploy into. The architecture declares an explicit dependency between these two modules, but there is not an implicit dependency between the resources in the VPC module and those in the Consul module.
In principle, the VPC could be created in a separate way up front, but since we are starting from scratch, we add it to our state and explicitly declare the dependency.
Tooling
In terms of tooling, these include:
- Terraform. Specific providers are:
- digital ocean
- http
- random
- Consul (optional): Used as the backend for the Terraform state.
- Vault: key-value store for digital ocean tokens
- Cloud init: creating the derived image, doing the installation and configuration of Consul on nodes.
Some observations on this tooling:
- Although the addition of cloud-init seems to break the design goal of immutabililty, since it alters the state of the image, it does allow us to avoid the use of Terraform provisioners and other tooling. The image itself is immutable after cloud init has run, which should only happen at first boot, so I think this is acceptable.
- The choice of storing the state in a Consul backend is predetermined. I used Consul because I have access to one in Hashi@Home, but an S3-compliant object store state could have been used, for example a DigitalOcean space. This is both cost-effective and simple, but has to exist before we can run a plan, just like the Consul backend.
- Vault is a dependency of this architecture since I am considering it the default means to access sensitive data. We are accessing encrypted key-value data, so this could be provided by a different provider in principle. However, Vault also allows us to entirely remove any secrets from the codebase, since even authentication to the backends is done using a
datalookup of secrets in Vault in Terraform itself.
Speedbumps
Satisfied with the tooling, I set about implementing the architecture with Terraform.
Most of the objects in the state would of course be digitalocean_xyz resources, such as digitalocean_droplet for the agent and server cluster, digitalocean_firewall rules for managing access, etc.
However, we also have a dependency on some external data.
Aside from the tokens used to authenticate to the cloud services, we would need to create an SSH authorized key using a lookup from a user’s GitHub keys URL and an existing VPC to deploy into.
So far so good!
That is, until we start enforcing the goal of “zero-touch” deploy. It soon became apparent that I would have to find some creative ways of configuring Consul on the fly without expanding the toolkit. A few of the aspects I needed to address to ensure zero-touch are described below. I call them “speedbumps”, since they slowed me down a bit and made me think about what I was doing.
Bind, advertise, client addresses
Since we start from scratch, the IP addresses are not known up front. We would need to know the private IP of the agent, so that we can tell servers to advertise on an address that the other members of the cluster can reach it. Of course, if one explicitly declares the network configuration assigning IP addresses to cluster nodes, these values can be passed to the Consul configuration, but this approach does not make much sense in a dynamic environment where the cloud does the work for you.
Without knowledge of the network configuration, we need to use a template to look up the interface address.
Cluster joining
Not only do the agents need to know details about themselves (which IP/port to bind to and advertise on), but also details about other agents, in order to join them to the cluster. Since we want zero-touch deployments, we can’t have a multi-stage deployment where we first create the agents, then discover facts about them, and then manually join them to each other – we need a mechanism whereby agents can discover themselves.
In order to do this, Consul provides a retry_join mechanism, and specifically for cloud deployments is able to interrogate the cloud provider to ask it for information about the agents.
In our case, we tag the droplets with consul-server and then configure the Cloud Auto Join for Digital Ocean.
This requires a token to authorise calls to the Digital Ocean API, which is in turn kept in a separate Vault KV store3.
This is then injected into the consul configuration as part of the user-data template, shown below.
Key generation
One of the first speedbumps was how to create the relevant Consul configuration. In particular, the creation of a shared encryption key to allow the servers to join the cluster.
The gossip encryption key is a central value that needs to be injected into the Consul configuration either via the configuration file, or as a command line parameter.
In principle, this does not represent a problem, since we can pass this value into either the consul.hcl configuration file, or the startup flag via the systemd unit, both of which are provided by the cloud-init template.
The problem however arises when we ask
“who knows this value?”
In the past, I have kept the Consul encryption key as a value in one of the key-value stores that Terraform reads from Vault. However, starting with fresh deploy, we need to generate it.
This looks like a Catch-22 at first glance, because we can’t generate an encryption key without Consul, but we can’t deploy Consul without an encryption key. What is more, if it’s generated on one Consul server, how is it then shared with the others? I spent a few hours thinking about this, tempted to revert to the “Deus ex Machina” approach of pre-registering a key in a Vault KV store… until I read the documentation again:
The key must be 32-bytes, Base64 encoded.
This is exactly what the random_id resource in the random provider does!
I added a random_id resource:
resource "random_id" "key" {
  byte_length = 32
}
and then passed it into the user data template:
resource "digitalocean_droplet" "server" {
  ...
  user_data = templatefile(
    "${path.module}/templates/userdata.tftpl",
    {
      consul_version = "1.12.3"
      server         = true
      username       = var.username
      datacenter     = var.datacenter
      servers        = var.servers
      ssh_pub_key    = data.http.ssh_key.body
      tag            = "consul-server"
      region         = data.digitalocean_vpc.selected.region
      join_token     = data.vault_generic_secret.join_token.data["autojoin_token"]
      encrypt        = random_id.key.b64_std
      domain         = digitalocean_domain.cluster.name
      project        = data.digitalocean_project.p.name
      count          = count.index
    }
  )
  ...
}
Data persistence and zero-downtime rolling changes
The Consul cluster is co-ordinated by a set of agents acting as servers. As we have mentioned before, one of the design goals was to have immutable images, so that when changes are required, we create an entirely new image and replace the old one with the new one. During these changes, we do not want the applications and other parts of infrastructure which depend on Consul for service discovery, etc to be impaacted. This means that:
- The cluster should not lose quorum during changes
- The cluster state should be persisted across changes
Data in the cluster state is stored in a shared database replicated with Raft. When making changes, we can ensure that there are always servers by using the Terraform resource lifecycle meta argument for the droplets:
lifecycle {
  create_before_destroy = true
}
This will ensure that droplets belonging to the previous state are only deleted once the new droplets have been created. However, this refers to the droplet state, not to the Consul state! Since cloud config takes a few minutes to complete, but Terraform will destroy old droplets as soon as the API reports that the new new droplet is “ready”, this will put our cluster into an outage for a few minutes while the new droplets come up.
What is more, we will lose the Raft data on the old droplets if it is not propagated somehow to the new ones.
There are new features in Terraform 1.2.0 for handling pre- and post-conditions. One could imagine that a post-condition would be a guarantee that new Consul servers are up, but polling the health check url. One can imagine a post-condition such as:
lifecycle {
    precondition {
      condition     = contains([201, 200, 204], self.status_code)
      error_message = "Consul is not healthy"
    }
  }
In this case, we need a data block for the HTTP check on the loadbalancer, but that data won’t exist until the first deployment is ready.
This sounds again like a Catch-22, but yet again reading the documentation carefully seems to show a way out:
In most cases, we do not recommend including both a data block and a resource block that both represent the same object in the same configuration. Doing so can prevent Terraform from understanding that the data block result can be affected by changes in the resource block. However, when you need to check a result of a resource block that the resource itself does not directly export, you can use a data block to check that object safely as long as you place the check as a direct postcondition of the data block. This tells Terraform that the data block is serving as a check of an object defined elsewhere, allowing Terraform to perform actions in the correct order.
So, if a data block is to serve specifically as a postcondition check it should only succeed if the Consul service returns healthy.
Creating these checks and adding them to the resources as follows
data "http" "consul_health" {
  url = join("", ["http://", digitalocean_loadbalancer.external.ip, "/v1/health/service/consul"])
  lifecycle {
    # Add lifecycle to server droplet resources too
    postcondition {
      condition     = contains([201, 200, 204], self.status_code)
      error_message = "Consul service is not healthy"
    }
  }
}
managed to generate a plan4.
Unfortunately, as described below, the consul service doesn’t start in time for the check to pass during the Terraform apply stage:
│ Error: Resource postcondition failed
│
│   on ../../../modules/terraform-digitalocean-consul/main.tf line 37, in data "http" "consul_health":
│   37:       condition     = contains([201, 200, 204], self.status_code)
│     ├────────────────
│     │ self.status_code is 503
│
│ Consul service is not healthy
So, there needs to be some stabilisation time before the check is conducted.
Perhaps I could do this with a remote-exec provisioner.
Zero-touch requires that we run terraform apply and then go the beach.
This means that the droplets need to be configured and the Consul service needs to be running with agents and servers all auto-joined to the cluster without manual intervention.
The Consul process itself is started by a systemd unit. This is created and enabled by Cloud Init via write-files which also creates the /etc/consul.d/consul.hcl configuration file.
However, since cloud-init itself runs as a systemd unit, we need to ensure that the Consul service is started only after cloud init has finished.
What is more it also needs to be started only after the cloud init user scripts in runcmd have completed else the executable consul won’t be present yet.
I haven’t figured out exactly how to determine what systemd event should trigger the start of the Consul service, other than it should happen when cloud init ends, but this answer gives some clues.
In the meantime, remote-exec provisioner runs a script to wait for the cloud-init process to finish before starting the Consul service:
connection {
    type = "ssh"
    user = "root"
    host = self.ipv4_address
  }
  provisioner "remote-exec" {
    inline = [
      "echo waiting for consul to be present",
      "while [ ! -f /usr/local/bin/consul ] ; do sleep 10 ; done",
      "while [[ ! $(systemctl list-unit-files | grep consul) ]] ; do echo waiting for consul systemd unit ; done",
      "service consul start",
      "echo waiting for servers to stabilise",
      "sleep 20"
    ]
  }
Cloud auto-join takes care of the rest.
A final consideration on this point was where and how to persist the Raft data. Currently, the data is written to a Digital Ocean volume mounted into the droplet, which is then attached to the next server in the group. However the volume can only be attached to one droplet at a time, meaning that if we want to perform a rolling update, we need to first destroy the droplet, detach the volume, then create the new droplet and attach the volume. But in order to maintain quorum this needs to be done one at a time.
Cloud Config template
Most of the heavy lifting is done in the cloud-config template. For completeness, I show it below.
# cloud-config

manage_etc_hosts: false
manage_resolv_conf: true
mounts:

- [ /dev/disk/by-id/scsi-0DO_Volume_consul-data-${count}, /consul, ext4, "discard,defaults,noatime" ]
users:
- name: ${username}
    ssh-authorized-keys:
  - ${ssh_pub_key}
    shell: /bin/bash
    sudo: ['ALL=(ALL) NOPASSWD:ALL']
packages:
- curl
- jq
- net-tools
manage-resolv-conf: true
resolv_conf:
  nameservers:
  - '${dns_recursor_ip}'
  searchdomains:
  - ${domain}
  - ${project}
  domain: ${domain}

write_files:

- path: /etc/consul.d/consul.hcl
    content: |
      encrypt = "${encrypt}"
      %{if server }bootstrap_expect = ${servers}%{ endif }
      datacenter = "${datacenter}"
      %{if server }
      auto_encrypt {
        allow_tls = true
      }
      %{ endif }
      data_dir = "/consul/"
      log_level = "INFO"
      ui_config {
        enabled =  true
      }
      server = ${server}
      client_addr = "0.0.0.0"
      recursors = ["${recursor_ip}"]
      bind_addr = "0.0.0.0"
      advertise_addr = "{{ GetInterfaceIP \"eth1\" }}"
      retry_join = ["provider=digitalocean region=${region} tag_name=${tag} api_token=${join_token}"]
- path: /usr/lib/systemd/system/consul.service
    content: |
      [Unit]
      Description="HashiCorp Consul - A service mesh solution"
      Documentation=https://www.consul.io/
      Requires=network-online.target
      Requires=cloud-init.target
      ConditionFileNotEmpty=/etc/consul.d/consul.hcl
      ConditionFileNotEmpty=/usr/local/bin/consul

      [Service]
      Type=notify
      User=root
      Group=root
      ExecStart=/usr/local/bin/consul agent \
        -auto-reload-config \
        -config-dir=/etc/consul.d/
      ExecReload=/bin/kill --signal HUP $MAINPID
      KillMode=process
      KillSignal=SIGTERM
      Restart=on-failure
      LimitNOFILE=65536
      StandardOutput=append:/var/log/consul.log
      AmbientCapabilities=CAP_NET_BIND_SERVICE

      [Install]
      WantedBy=multi-user.target

runcmd:

# Remove existing entries that point to localhost

- sed -r 's/^._consul-._$//' /etc/hosts

# Get Consul

- |
    curl -fL <https://releases.hashicorp.com/consul/>${consul_version}/consul_${consul_version}_linux_amd64.zip \
    | gunzip -> /usr/local/bin/consul
- chmod a+x  /usr/local/bin/consul
- consul -version
- systemctl daemon-reload

# Enable the consul service

- systemctl enable consul
Final considerations
It took about a week of work to create a Terraform module for Consul on Digital Ocean. At the time of writing, there doesn’t seem to be one in the public registry, so at least I seem to be making a tiny dent in the universe.
Overall, I find the simplicity of Digital Ocean to be a nett feature It provides just enough in terms of services to treat as IaaS, while being very cost effective. What does that mean? I spent about about 5 USD in resources to develop this module – about a week’s worth of terraforming Digital Ocean. It takes under four minutes to deploy this and costs less than USD 5 a month to run.
I should point out that a lot of the speedbumps here were due to the fact that the cloud provider doesn’t have a very sophisticated set of services. Server stabilisation and rolling updates are much easier with AWS autoscaling target groups for example. However, I expect this to be the case for many on-premise private cloud providers like VMWare or bare-metal providers, so it is a very useful exercise to implement the lifecycle logic in the module itself.
Finally, I took the new post- and pre-conditions for a drive. At first they can seem somewhat counter-intuitive, but once you do things the “Hashi” way, I can see how they work well. This is, in my opinion, a very welcome addition to the Terraform language, obviating the need for extra tooling.
The next steps will be to include the Consul ACL token and TLS certificates into this module.
The code accompanying this post is available at:
Stay tuned for the next iteration of Hashi on Digital Ocean – deploying a Vault cluster.
If you’re keen on running this exercise yourself, please use my referral link to get some free credits on Digital Ocean.
Footnotes
-
Some might say that I should just spend the time and money on a Hashicorp certification. Although I don’t disagree with this sentiment, I would also point out that many folks like me only learn how something really works when they break it. It’s the physicist in me… I feel far more comfortable saying that I am proficient in a tool when I have used it to solve a problem. ↩
-
The loadbalancer should probably be replaced with some good old DNS records. ↩
-
It would be really nice if Vault supported a Digital Ocean secrets mount, such as the AWS, Azure and Alibaba, etc. ↩
-
I originally added the droplets by ID to the load balancer, creating an explicit relationship between them. This broke the DAG, so I had to configure the LB to add droplets by tag instead. ↩